Thursday, November 08, 2012

Not Just For Kids

I have a bulletin board in my office that collects fabrics I really like, papers I don't want to forget about, a yoga schedule, etc. Currently there are a few fabrics that have morphed into a full on design scheme... but with nowhere specific in mind to put it. I think it would be great in a little boys bedroom, or a superrrr cool girls bedroom. (It is actually this scheme I blogged about a while ago.... yep, It's still up there!) It pretty much started because of a piece of art I saw, that I didn't want to forget about- so, I printed it off and started pinning fabrics beside it... sometimes these things just have a life of their own.
Anyways- this art, is SO cool. Christian (we almost have the same name... so clearly he is awesome) Jackson creates super minimalistic posters of children's story books we all grew up with.

Check them out...

Little Red Riding Hood
Source
The Princess and the Pea
Source

Goldilocks and the Three Bears
Source
Mary Poppins
Source
The Three Little Pigs
Source


I think these are total scheme starters, or a great addition to any kids room. I hope you think they are as neat as I do! Which one is your fave? I really like the Marry Poppins one... even though I thought the movie was totally creepy- singing and flying around, forcing medicine down kids throats- terrifying! But I could deal with the poster....

Have a great Almost-Friday-Day!
xo
C

Ps. Thanks Ash for the great Post Name ideas!

Wednesday, November 07, 2012

Stick it to the Dino


So, this DIY may be all about dinosaurs... Actually, it is. Which I kind of love. It made my day, I hope it makes yours. You will get to play with little plastic animals. When was the last time you played with little plastic animals!? In all seriousness, I don't think I ever played with little plastic animals. So I can now say I have had my chance and it was awesome.


I saw a DIY recently over on Harpers Happenings and I loveeed the idea. I think something like this would look awesome in a kids room or kids craft area. I wanted to do something similar, but turn them into magnets. Why shouldn't you see these on your fridge everyday and smile at how ridiculous they are!? 
Source: Harpers Happenings

I just Googled "Gold Animal Magnets" and "Gold Dinosaur Magnets" and sadly I am not the first to do this, but regardless they are super easy to make and fun to look at! I found my animals and dinos at the dollar store as well as the perfect sized magnets and Krazy glue- it's a one-stop-shop people! (Minus the spray paint...) Start by lining up your animals so you can have a really good look at them... okay, you don't have to do this... but I really wanted Dave to come home and find 20 dinosaurs in a "V" formation on the table and wonder what the hell I had been doing all day. Working, clearly!


The key to keeping this DIY safe and easy is boiling the animals in water. I know this sounds super odd, but trust me- it really softens the plastic and makes it a million times easier to cut through. Boil the little guys for a few minutes, dry on paper towel and cut in half. You can then attach the magnets with Krazy glue and spray paint. I originally tried acrylic paint and it was a bust, too many brush marks and it didn't cover evenly. I would also suggest a spray paint primer before the gold, which I didn't do- and this resulted in having to do 4 coats of spray paint.

Allow your animals and dinos to dry over night and then stick away! It totally looks like Jurassic Park on my fridge right now and I am loving it....

Happy hump day!
xo
C

Tuesday, November 06, 2012

Another Dimension

Hey-
Just a quick snap shot of what I have been working on all day... It's been a while since I have done some 3-D work, but it's SO fun. It totally helps to see things in another dimension eh? This is one of two kitchens I am working on right now, the super exciting part about this will be comparing the 3-D shots to the real deal in a couple of months... stay tuned.


xo
C


Ornamental Cabbage

I have something to confess. I have a weakness for Ornamental Cabbage. Weird right? I don't know what it is about it, maybe the colours, different textures or that when I see it I know fall/ Christmas is around the corner?! Whatever it is, I was drawn to it yesterday at one of my favorite flower shops on Avenue Road (Toronto). They were so tiny, pale pink and white- I knew I had to have them. And then I saw Fringed Tulips, and it was over- I knew I was going to have to make a full on arrangement. I first saw Fringed Tulips at a wedding show last January and I so badly wanted them at my wedding- but they were not in season so I moved on. This was the first time I have seen them since- wait until they are open, they are crazy-beautiful.
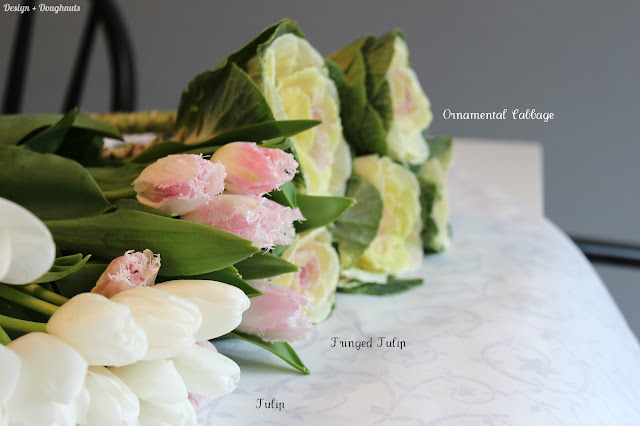
I want to show you the basics of creating your own flower arrangement at home today. It's so worth it, and the pre-made arrangements you can buy are just so nasty and filled with 'filler' (leaves, babies breath, blah). Limit yourself to 3 different flowers, I pulled the cream and the pink out of the cabbage to find my combination. In general, I am SO NOT a pink and white person, but something weird came over yesterday and I went with it.
Start by unwrapping your flowers, remove the packaging and find a vase that you want to work with. Once you have that covered, fill your vase with cold water and mix in the plant food- this is key if you want your flowers to last. I always ask for extra so I have a few lying around the house if a florist forgets.
Now, I know there is a special tool for this (I have seen Martha use it) (...you know, Martha Stewart...duh), but I am not a florist, so I use my hands- peel back any leaves on the flowers stem that will be in the water. This is an important step, the leaves will start to rot in the water and really reduce the life of the fresh water in your vase and the flowers in general.

Once you have removed all the stems, start making your arrangement in your hand- yes, pick up one flower, put it beside another and continue adding- do not put them in the vase (you cant fit as many flowers and the shape is harder to control).

If the arrangement starts to get to large to hold in your hand, you can secure the stems with an elastic which will hold everything together until you are ready to trim the ends. Continue to add until you are happy with the shape and design of your arrangement, secure an elastic around the stems and hold your arrangement up to your vase to decide how much of the stems to cut off. Remember you can always cut more off, but you can't add!


Once you are happy with the height of the arrangement, cut off the elastic and place the flowers in your vase. I put mine into the vase picture above and they flopped everywhere (the vase was too open at the top) so I had to switch up the vase- no biggy- trial and error people! The arrangement is pretty... but honestly... it is SO not me. I totally wish I didn't buy pink, it looks like a really nice wedding arrangement or baby shower arrangement- not a fall-ish awesome arrangement. Oh well better luck next week!


I had a few extra tulips that I cut down to fit in a small vase above my kitchen sink. This one is a bit more me, super simple and pretty. I hope this helps with your next arrangement, have fun with it!

Happy Tuesday Peeps.

ps... this may or may not be coming tomorrow...

Totally did that... and it kind of just made my day...
 
xo
C

Monday, November 05, 2012

Wish

Sunday Brunch is quite possibly one of my favorite things about the weekend. Meeting up with friends, trying somewhere new or going to the old standby (School in Liberty Village always makes my day) and eating amazing food is what its all about. This weekend a few of my girlfriends and I tried out Wish in Toronto, which is just south of Bloor Street. It was A-mazing. The food... grilled nutella sandwich... was amazing, as was the decor.

http://wishintoronto.com/
 
Above is their broiled grapefruit with raw sugar, which was not only gorgeous, but super yummy as well. Picture creme brulee crunchy top, but on grapefruit.... I know!
 
http://wishintoronto.com/

Could this place be any cuter? Yes, the design is trendy with the white washed brick walls, carerra marble table tops and neon chairs- but it just makes you want to smile. And lets be honest, white goes with everything, so next year they could spray the chairs gold or navy if that's in. O.M.G. I wish they would do that right now- that would be insane. I would go for lunch and dinner too.

http://wishintoronto.com/
 
On the right is the nutella sandwich served with their house made raspberry jam. We split this baby for the table and, wow it was good- I was seriously considering drizzling nutella on my oatmeal this morning just to reminisce... but I decided against it at the last second for the sake of my hips. I ordered the Florentine- poached eggs (perfectly, I might add) over wilted spinach with leek and Parmesan fondue (hips are not thought about on Sundays). I know. It was as amazing as it sounds. Day dream with me about being transported back there this second... and have a great Monday!
xo
 
**All images sourced from Wish.com 

Friday, November 02, 2012

Project Sneak Peek

It's Friday! Man, did anyone else feel like this was a really long week, but short at the same time? Does that make sense? You know, you feel like you did a million things and it was exhausting, but it's already over and you with you could have squeezed in a million more? Alright... slight exaggeration... maybe not a million- you know what I mean!
Anywayssss, it's Friday, and I am excited to get down to the farmers market this weekend and get caught up on a bit of work! Today I wanted to show you a few quick snap shots of a clients that I visited this week. The main project was to finish the basement into an office and kid lounge zone (2) and update the three bedrooms into comfortable, fun, personalized spaces. These are just snip its- no staging or proper lighting in the photos but I am really happy with the result!

(1) In the daughters room, we wanted to keep it fresh and inviting. I love the mix of white furniture with the greys and yellows- the perfect colour palette for a teen! (Art still needs to be hung in here...)


(2) The basement- there are still shelves and a bit more art to go up in this space, but I could not have been happier with the result. The soft grey palette is bright and inviting- you would never know you are in a basement!


(3) The teen boys room was fun, we made it a total 'man zone'. The deep grey flannel headboard and checkered bedding are menswear inspired, while the brown velvet pillows and mix of wood help to bring warmth to the space. (Art and shelves still need to go up in this space)


(4) The master bedroom was to be fun and girly. We went with a gorgeous upholstered headboard with nailhead details and a soothing palette of taupe's, sages and linen. The drapery added a lot of warmth and richness to the space, as did the soft chandelier. (Art and new bedside tables are on the list of to do's in this space.)


I hope you like the sneak peek of these rooms as much as I do!
Happy Friday everyone and have a great weekend!
xo
C

Thursday, November 01, 2012

Snowpuppe


Snow wha? I don't know the answer either, it's Dutch. But I know I love it. I found Studio Snowpuppe on etsy last week and instantly fell in love. Look at these beauties- how could you not!? 


Nellianna and Kenneth are based out of the Netherlands and create these stunning light fixtures out of paper. I love the mix of colours, you can customize the cord and colour for endless combination possibilities. Amazing Right?!

1| Moth Origami Lampshade in Pink and White
2| Chestnut Paper Origami Lampshade Pink
3| Moth Origami Lampshade Brown

Happy November!!! Can you believe it's November? It's basically almost Christmas.... CAN'T WAIT.
xo
C